Essays >> Collecting mushrooms for scientific study

A day in the woods searching for mushrooms is one of the great pleasures of summer and autumn. Most people who do this are looking for something good to eat and will pass up any mushroom they are not sure about. Throughout the world there are organizations for people who wish to learn about mushrooms, which to eat and which to avoid. Some mushroomers start out this way but gradually begin to look beyond the next meal, learning to appreciate the beauty of these fascinating objects and perhaps even venturing to identify one.
There are many field guides to mushrooms offering a means of identifying them. At first this seems to work; pore over the pictures and descriptions and you may settle on a name that seems to fit the specimen in hand. To do this reliably it may be necessay to use several books and to spend a lot of time getting the job done. Finally, the books may require you to make a decision based on features only visible with a microscope. At this point many enthusiastic beginners just throw up their hands and give up. That's unfortunate, because obtaining a microscope and using it are not as difficult as most people think.
If you go on a mushroom foray organized by a local club you will probably see one or more "experts" quickly identifying mushrooms and laying them out on a table for the members to see. These experts will probably have a microscope and a number of rather academic-looking books to aid them in their identifications. These people are fast, being able to identify as many as 100 species in a single day. However, if you corner one of these experts and ask some probing questions you will probably find out their identifications are not made with 100% confidence. Most such identifiers would not want to stake their professional reputations on the names they have provided and would certainly not work the same way while doing their own research.
So what do the pros do when they want their identifications to be more accurate? Can an amateur ever hope to rise to these professional standards? A quick answer to the first question is simply that they devote a great deal more time, skill and attention to their work. The answer to the second question is a simple yes.
Reliable identification of an unknown mushroom takes time, perhaps several hours. Attempting to identify a large number of collections accurately is simply impossible on a foray or field trip. The solution is to do no more than note down the characteristics of the mushroom that may be of use in its identification and then dry the specimen for later study. This what the pros do. Even if you are not a pro and plan only to ask for help, this is what you need to do. An additional benefit of the describe-and-dry method is that you have a permanent specimen for deposit in a herbarium (fungus museum) as evidence the collection was actually found in your area. Contact a professional mycologist, he or she may be really pleased to receive your properly described and dried specimens. If you are truly bitten by the bug you may wish to work on your own dried material before depositing it in a herbarium. The steps needed to bring all this about boil down to four: 1) collect the specimen in a manner ensuring its safe transport back to your work area and carefully note its habitat, 2) make the necessary descriptive notes, 3) dry the specimen, and 4) use the dried specimen along with the descriptive notes to make an identification.

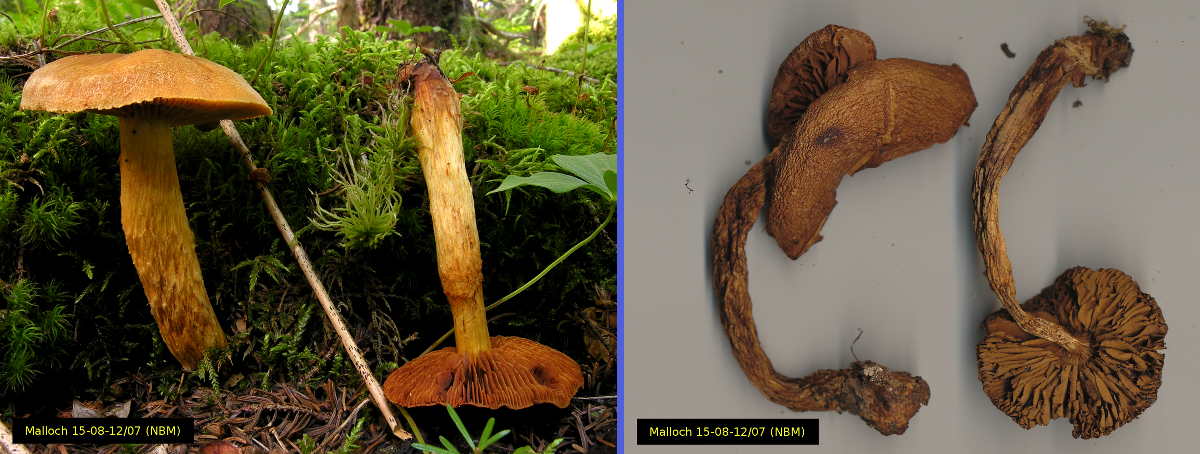
So why is it necessary to do all that preparatory work before drying your mushrooms? The answer to that question is quite clear when you compare a mushroom before and after it is dried. The photo above left shows two fruiting bodies of Cortinarius limonius, a species commonly found in wet spruce forests. The photo at right is of the same two fruiting bodies after they had been dried. Notice how the bright yellow orange colours of the fresh specimens are completely lost. The stipes of the fresh ones are slightly wooly, while this feature is not evident in the dried specimens. When fresh they might have had a characteristic odour that is no longer there when dried. Although the pictures are not quite to scale, there was a considerable amount of shrinkage on drying. Click on the images to see enlargements for even closer examination. In spite of the changes, the dried material is highly useful for microscopic analysis and can be kept that way almost indefinitely. In addition a small piece of the dried material, perhaps as little as a small piece of one gill, can be used for the extraction of DNA and its subsequent analysis.
COLLECTION
When you see a mushroom you wish to collect, the first thing you may decide to do is take a photograph of it. Photographs are highly useful to the identifier because they often reveal things that are overlooked in the notes. In spite of all your care the specimen may change colour before it reaches your work area and may have easily lost scales or markings. A simple point-and-shoot camera will usually take excellent photos of mushrooms. You should also record the species of trees at the collecting site, since these may be symbiotically linked to the mushroom through mycorrhizae. Rather than writing down these observations I usually put a leaf of each tree in with the collection. If the mushroom is growing on wood, record the species of the log or branch. Sometimes this is difficult, but you can at least note whether it is a hardwood or a conifer. If you can't even decide that because the wood is so rotten, include a piece of the wood with the collection. It is often fairly easy to identify a wood sample later by examining its microscopic anatomy.

When collecting the mushroom try to dig down to its very base so you will have the whole thing. A sturdy knife is useful for this. People collecting mushrooms for food often cut the mushroom off at ground level, but this may make the specimen useless for identification. When you have it out of the ground or wood, place it in a container where it will not be crushed as you continue your search. Try to collect different stages of development of the mushrooms if you can. I place each of my collections on a square piece of waxed paper and carefuully roll it up, twisting the ends. These packets are then placed vertically in upright boxes in my knapsack. Many collectors prefer to carry a basket for their wrapped specimens, but I have experienced too many spills and crushed specimens to do this any more. Small specimens can be placed in plastic pill bottles or put into the compartments of a plastic box designed for fishing tackle.
DOCUMENTATION OF THE COLLECTIONS
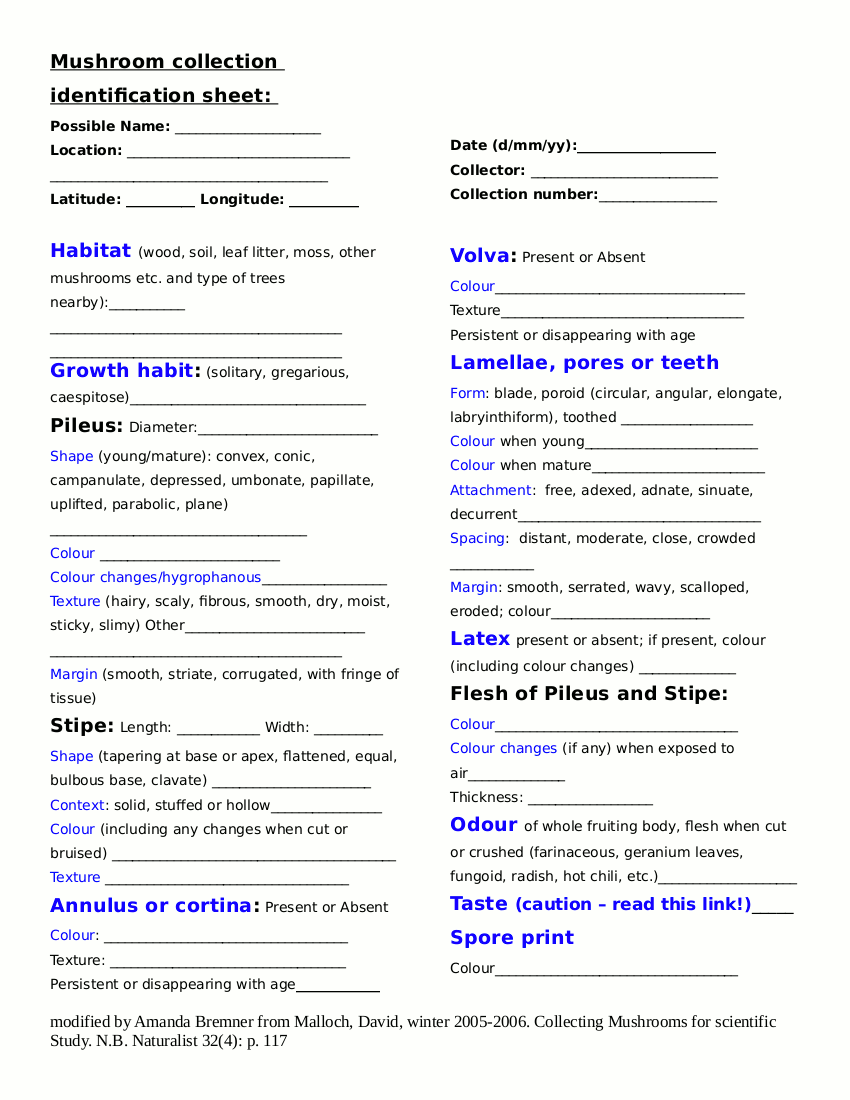
You should begin working on your collections as soon as you can after returning home or to your work area. As they begin to dry, the colours of many of your collections will start to fade. For this reason, keep the specimens wrapped up until you are ready to work on them. My first step in specimen preparation is to place the mushroom I am starting with on a flatbed scanner and scan it at 600 or even 1200 dpi. Scanners have remarkably good colour rendition and will often record features you may not notice at the time. A simple sketch may also be useful. I then begin to record features of the mushroom that will be lost when they are dried. This is a rather formal process occupying 15-30 minutes per specimen. Experience gained from working with dried mushrooms, along with a few frustrating omissions, will guide you in recording the information you will later need. Long ago I made up a sort of checklist of features that may be needed for identification. Later Amanda Bremner, Curatorial Assistant, Botany and Mycology Section at the New Brunswick Museum, arranged this checklist into a form more useful for beginning collectors. This form is presented below. Text in blue are links to detailed discussions and illustrations. Use your browser's back arrow to return back from these pages. You can also download a printable pdf version of the form.
Some older browsers may not be able to respond to the blue links in the checklist form. If you are having this problem click here for a simplified version.

At the end of the note form you will see a line for recording the colour of the spore print. Unless you accidentally (or purposely) obtained one between collecting the mushroom and returning home you will not be able to complete this task. Read the page on spore prints to learn how these are made and why they are so important to mycologists.
DRYING THE COLLECTIONS

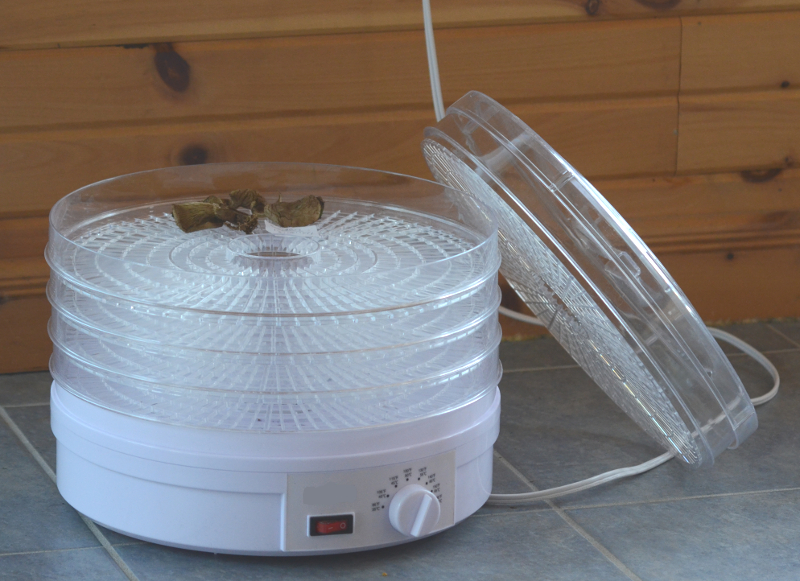
Drying is a very important step in preparening your collections for study. It's necessary to get the mushrooms dried fairly soon after they are collected and documented because decomposition has already begun to take place. Many collectors, amateur and professional, use a food dehydrator of some kind. The picture at right shows a commonly available kind having several trays stacked up over the heat source. The one in the picture has had the upper tray and the lid removed to show some mushrooms sitting on the next tray below them. Many food dehydrators have a thermostat, allowing a variety of drying temperatures. The temperature should not be so hot that the mushrooms are burnt, nor should it be so low that they don't get dry withing 24-48 hours. Temperatures somewhere between 45° and 70° C. work well; I compromise and use 55° C., which will dry most mushrooms in 24 hours. There is a rapidly growing interest among mycologists to examine the DNA of mushrooms as a powerful means of examining their relationships to one another. DNA deteriorates over time and is also sensitive to high temperatures and certain chemicals. Those interested in extracting DNA from dried mushrooms have suggested rather low drying temperatures for best results. However, Drs. Kentaro Hosaka and Kunihiko Uno of the National Museum of Nature and Science in Ibaraki, Japan, investigated this issue closely and concluded that drying temperatures as high as 71° C. had no harmful effect upon DNA quality (Bulletin of the National Museum of Nature and Science, Series B 37: 101-111. 2011).
Some people suggest that it may be useful to rotate the dryer trays two or three times in 24 hours to allow even drying. This may be a good practice, but I have never had any difficulty getting my collections dry without it. Perhaps some dryers do a better job than others. Large mushrooms may not fit in the dryer and may have to be cut into smaller pieces. This can be done by cutting the fruiting bodies in half lenthwise or by removing the cap from the stem. We don't particularly like our herbarium specimens chopped up into really small pieces, but by exercising a little judgement you can usually get a workable result.
If it is just for the benefit of some distant scientist, you may wonder if it's really worth buying a food dehydrator. Actually these appliances are not very expensive and are useful for drying all kinds of vegetables, mushrooms, fruit and even making beef jerky. There are a number of sites online devoted to preserving foods with a dehydrator.
MAILING THE COLLECTIONS
When it's not convenient to deliver your mushrooms in person you may wish to send them through the mail. Since dried mushrooms are often rather fragile it is necessary to protect them from damage in transit. Put them into paper bags or zippered plastic bags with lots of air trapped in them to act as cushions. Pad the shipping box with bubble-wrap or other protective material. It is rarely a good idea to send fresh mushrooms because they will deteriortate considerably before they are received. If it seems absolutely necessary to send fresh mushrooms, wrap them in paper towels to absorb excess moisture. NEVER send fresh mushrooms in plastic bags; they will be quite soupy and utterly disgusting by the time they arrive.